|

I mentioned in a previous tip the importance of correct colour balance in your photographs. This week I review the ExpoDisc White Balance Filter by ExpoImaging.
The filter is a translucent plastic filter that averages the light values in your images to create a gray reference frame. Then using either a custom white balance setting on your digital camera, or through your image editing software, you use the reference frame to balance the colour in your other photographs.
Using the filter is easy. The filter comes in various sizes to match the filter size of your lenses and has three small spring loaded bearings on the outer ring. This allows the filter to be securely, yet easily, fastened to your lens. Next, using an automatic exposure program (P, A or S typically) and manual focus point the camera at the light source and take a photograph. The manual focus simply keeps the camera from searching for focus. The resulting image will be a frame of an almost uniform gray. Then, following the instructions for your particular camera, set the camera to use the custom white balance you just recorded.
Testing
For my testing, I used three different light sources, a pair of small halogen spot lights, a pair of daylight balanced fluorescent bulbs and a pair of natural light incandescent bulbs. My subject was a colour test image from DigitalDog.net, a website which has a wealth of information about colour management.
The tests were conducted in the same way for each light source. One frame with Auto White Balance set on the camera, one frame to record the reference image, and finally, one frame with the custom white balance I created with the second frame. Each image was metered for proper exposure using a handheld light meter at the subject pointing to the light source with the exception of the reference frame which was photographed at the subject pointed toward the light source using 'P' program mode.
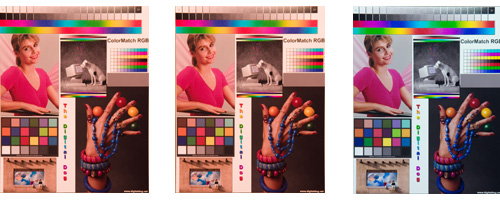
Each sequence of images from left to right shows the light sources in the order: Halogen, Incandescent, Fluorescent. The first sequence shows the effect different lighting conditions can have on your images. Colour cast ranges with each light source are brown, pink and blue.
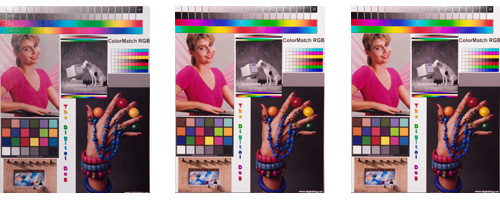
The second sequence of images shows the the image that is recorded when using using the ExpoDisc. Notice the colour is fairly similar throughout the images when using the custom white balance filter, but still shows a colour cast. Your reference frame will be tinted with the colour of the light and your camera or image editing program) uses this to make it's white balance adjustment. This sequence shows the differences in colour much better.

Finally, the last sequence shows the three images with the custom white balance filter applied. The three images now look very similar in colour to each other and more importantly, look closer to the original.
Check For Dust
One problem with digital SLR’s is dust on the sensor. When shooting with small apertures such as f16 or smaller, dust on your sensor can be seen in photographs with continuous tones. With the ExpoDisc installed, it is easy to check for dust. Following the same procedure to capture a reference frame, but being sure to use a small aperture of at least f16 will give yield a good shot for you to look for dust with. Load you the image into your favourite image editing program and examine the image for small, darker spots. After following your manufacturers instructions for your camera on cleaning its digital sensor, put the ExpoDisc back on your camera and repeat the procedure to verify you have cleaned your sensor.
Real World Examples
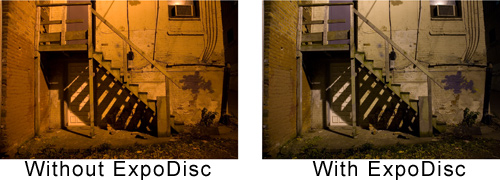
While the examples I provided, shot in a controlled environment, provide great examples of how well the ExpoDisc works, real world use is the big test. The first example below is of a pink rose. The image on the left was shot using auto white balance. The image on the right, with a custom white balance derived from the ExpoDisc. The second image is of a stairwell at night lit by a streetlight. Again, the image on the right shows how much better the colour is with the help of the ExpoDisc.


Finally, the third image is of a streetscape in a neighboring town again shot under street lights. The image on the right shows the correct colour of the scene, achieved with the help of the ExpoDisc White Balance Filter.
Correct Colour Cast in Photoshop
As I mentioned earlier, it is also possible to adjust the colour balance after you photograph a subject providing you have created your reference frame in your camera using the ExpoDisc when you captured your image. In Photoshop, load both your reference frame and your photograph. With the reference frame selected, open the curves dialog box, select the gray point selector then click in the center of the image. Simply drag this curve from the source (gray reference frame) to the destination file (your image) and watch as your colour is corrected. Of couse it is always best to start with the highest quality image you can which should begin with the ExpoDisc. However, if you camera does not have the option for a custom white balance this process will help you obtain accurate colour.
Price
The ExpoDisc is widely available and the ExpoDisc.com website has a complete listing of retailers. It is available in a variety of sizes, shapes and formats, including drop in filters for the Lee filter system, ExpoDisc Warm Balance filter, ExpoCap (an ExpoDisc built into a lens cap design) and the original ExpoDisc. The original is available for $114.79 US from Amazon.com. My suggestion is to purchase it in a 77mm filter size to accommodate your largest lens (and likely the largest you will own). If you do not expect to purchase additional lenses, to purchase one to fit your largest lens and simply hold the filter in front of the lens when using smaller filter sizes.
Conclusion
I first saw the ExpoDisc in Action at a Monte Zucker seminar and wasn't sure how necessary a product like this was, especially in controlled situations like when using studio lights. After using the ExpoDisc, I am convinced that even though the auto white balance feature on digital camera's is always improving, they can still be improved upon. Using the ExpoDisc takes only a few seconds, yet provides more accurate results than the in camera auto white balance, or even the preset white balance options.
Do you need the ExpoDisc? That depends on how important accurate colour is to your photography. As a nature shooter, there are many times I don't want to correct the colour of my image, as a portrait shooter, I have to have accurate colours. A bride simply does not want her white dress tinted due to the colour temperature of the light.
The ExpoDisc White Balance Filter does and excellent job providing accurate colour in your photographs. And as always, it is best to start with the best possible image you can before having to make adjustments after the shot.
Return to FreeHelp Hardware
Reviews Home Page
Return to the FreeHelp Headquarters
Return to PCIN.net Home Page
|